This is one of my favourite item in a sadya. Also, this is one of the veg dishes that I learnt to make during my initial cooking days. I’ve been wanting to post this recipe here for a long time, but it happened only now. Anyways, what’s a better time than Onam to post this, right?
Since you are busy with Onam preparations, I”m going staright to the recipe…
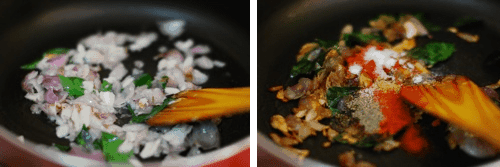
Cook mathanga with 2 cups water and salt. When it is cooked well, mash it well. Grind together coconut, jeera, green chilli, turmeric powder with 2.5 tbsp water…
Add the coconut paste to mashed mathanga, mix well and cook on low flame for 5-7 mins…
Heat oil in a pan and fry the coconut till it turns golden brown. Crackle mustard, add sliced onions and curry leaves. Fry till the small onions turns golden brown. Pour this over the cooked mathanga. Garnish with fried coconut…
Mathanga – 3.5 cups (approx), cut into bite size cubes
Water – 2 cups
Coconut – ⅓ cup
Cumin (jeera) – a pinch
Green chilli – 2, chopped
Turmeric – ½ tsp
Salt
Coconut oil
To temper
Mustard – ½ tsp
Small onion – 4, sliced
Curry leaves
Garnishing
Coconut – 2-3 tbsp
Instructions
Cook mathanga with 2 cups water and salt. When it is cooked well, mash it well.
Grind together coconut, jeera, green chilli, turmeric powder with 2.5 tbsp water. Add the coconut paste to mashed mathanga, mix well and cook on low flame for 5-7 mins.
Heat oil in a pan and fry the coconut till it turns golden brown. Keep it aside. In the same pan, add more oil and crackle mustard. Add sliced onions and curry leaves. Fry till the small onions turns golden brown. Pour this over the cooked mathanga. Garnish with fried coconut.
Notes
You can add more water to the mashed pumpkin and continue cooking, if you want.
You can also make erissery with kaya (raw banana),chena (elephant yam) and papaya using the same recipe.
It’s been sometime since we have cooked with eggs, right? I’m always on the look out for a good egg recipe and this definitely is my current favourite. What I liked most about this recipe is that, you can have it for breakfast with some toast or for lunch with some rice or even for dinner with some chapathi :) Since it uses pretty much basic ingredients, it’s ideal to make if you have any unexpected guests and it can be prepared in a jiffy!
Do I need to say more…
Here you go…
Heat oil in a pan and add the chopped onion and green chilli. When onions become soft (no need to brown), add turmeric powder, salt and curry leaves. Mix well…
Add beaten eggs and scramble them…
When the eggs are half cooked add coconut and jeera. Mix well. Cook for 3-4 mins on low flame. Add 1/2 tsp crushed pepper and mix well…
Beat the eggs well and keep it aside. Combine coconut and cumin, using your hands. Heat oil in a pan and add the chopped onion and green chilli.
When onions become soft (no need to brown), add turmeric powder, salt and curry leaves. Mix well. Add beaten eggs and scramble them.
When the eggs are half cooked add coconut and jeera. Mix well. Cook for 3-4 mins on low flame. Add ½ tsp crushed pepper and mix well. Serve hot with rice, toast, chapathi etc;
Notes
I used 2 whole eggs and 3 egg whites. You can make it only with egg whites also. The qty of coconut can be adjusted to suit your taste.
I’ve posted around 15 + chicken recipes here, but… every single time I’m cooking for guests, I’m confused what to make! Happened to find this chicken curry during one such time and since then, it has become one of my constant companions while entertaining guests. I made this recently and that’s when I realised something… I haven’t shared it with you yet! I dont know how I missed it, but as I always say “better late than never”.
Also if you are looking for the thick gravy chicken curry types that you usually get in restaurants, give this one a try. I’m sure you will not be disappointed. While typing down the title of the dish, something caught my attention…There are many restaurants whose advertisements focuses on the fact that they try to serve homely food and here we, the home cooks want to make restaurant style curry, isnt that a sort of irony or is grass always greener on the other side ;)?
What I like most about this curry is, it goes well with almost anything and it has that minimum guarantee. It’s a pretty basic and simple chicken curry, but the process gives it a whole different look and feel :) Hope you also enjoy it.
Heat oil in a deep pan. Add finely sliced onions and cook till it turns golden brown. Add crushed/grated ginger garlic and cook for 2-3 mins or till the raw smell goes…
Add turmeric, chilli, coriander, fennel, pepper powder and garam masala. Mix well. Cook till the oil appears, around 2-3 mins. Add chopped tomatoes and salt. Mix well…
Cook till the tomatoes becomes soft. Let it cool for sometime.Grind the masala to a smooth paste by adding 1-2 tbsp of water.In the same pan, add some more oil and add cleaned chicken pieces. Mix well. Cook till the chicken pieces start changing colour…
Add the ground masala. Mix well and make sure the chicken pieces are coated well with the masala and cook for 3-4 mins.Add medium thick coconut milk and give a stir. Cover and cook till the chicken is done…
Add thick coconut milk and stir. Cook for 5-7 mins. Remove from fire. Add the fried shallots and curry leaves to the curry…
Chicken – 950 gms, after cleaning, cut into small-medium size pieces
Onion – 3 medium-large, finely sliced
Crushed/grated ginger and garlic – 1 – 1.5 tbsp, each
Turmeric powder – ½ tsp
Chilli powder – 2 tsp
Coriander powder – 2.5 tsp
Garam masala – ½ tsp
Fennel powder (perumjeerakam) – ½ tsp
Pepper powder – ½ tsp
Tomato – 1 big, chopped
Medium thick coconut milk – 1.5 cups
Thick coconut milk – ½ cup
Salt
Oil
To temper
Mustard seeds – ½ tsp
Small/Pearl onion – 6, sliced
Curry leaves
Ghee/oil
Instructions
Heat oil in a deep pan. Add finely sliced onions and cook till it turns golden brown. Add crushed/grated ginger garlic and cook for 2-3 mins or till the raw smell goes.
Add turmeric, chilli, coriander, fennel, pepper powder and garam masala. Mix well. Cook till the oil appears, around 2-3 mins. Add chopped tomatoes and salt. Mix well. Cook till the tomatoes becomes soft. Let it cool for sometime.Grind the masala to a smooth paste by adding 1-2 tbsp of water.
In the same pan, add some more oil and add cleaned chicken pieces. Mix well. Cook till the chicken pieces start changing colour. Add the ground masala. Mix well and make sure the chicken pieces are coated well with the masala and cook for 3-4 mins.
Add medium thick coconut milk and give a stir. Cover and cook till the chicken is done. Add thick coconut milk and stir. Cook for 5-7 mins. Remove from fire.
In another pan heat oil/ghee and splutter mustard seeds. Add sliced small onion and curry leaves. Cook till the onions turn golden brown. Add this to the chicken curry and serve hot.
Notes
I used coconut oil, but you can use ghee or refined oil also.
The gravy tends to thicken as the curry rests, so adjust the consistency of the curry accordingly. It pairs well with ghee rice/pulao/roti/appam etc;
You can also add cashew paste to make it more creamier. Soak 1-2 tbsp of chopped cashews in 2 tbsp hot water for 10-15 mins. Grind it to a smooth paste. Mix the cashew paste with thick coconut milk and add it to the curry.
Have I told you before that my brother and myself, got married around the same time? Yep, within a gap of two weeks. So during that time, me and Divs (my SIL), used to call each other every now and then to share our wedding preparations. We used to discuss at length all the wedding related things, mostly shopping and stuff. One day, during our usual discussion she told me that she started doing some cooking experiments and made Rasam. Her cooking experiment had a lightning effect on me… the panic button in my system automatically switched on! The thing was.. cooking never fitted into my “happily ever after” frame!
I frantically ran around the house searching for an old diary, got one and went straight to my aunt’s place. In one go I wrote down around 10 recipes and then… I started to breath normally. That was my induction training in cooking. Later I figured a way to fit cooking into my “happily ever after” frame. If I’m doing the cooking, I’ll have my own kitchen, so if I’ve my own kitchen, I get to decide what all things should be there. That means… I get to shop, see now it fitted perfectly into my scheme of things ;)
Anyways, coming back to that Rasam recipe, Divs was happy to share it here. It’s a bit different from the normal Rasam recipes I had. This recipe has a punch to it and I like it. The other thing I like about this recipe is it doesnt use any Rasam powder and also it doesnt need any lentil stock (parippu vellam). It can be prepared in a jiffy and it gives a spicy kick too…
Tamarind (valanpuli/sambar puli) – small lemon size, soaked in ¼ cup water
Black pepper corns – 10
Dry red chilli – 4 (seedless)
Garlic – 6 cloves
Jeera – ¼ tsp
Whole coriander – 1½ tbsp
Kayam (asafoteida) – a pinch
Salt
Coconut oil
Chopped coriander leaves – 1-2 tbsp
Instructions
Fry the dry red chilli for a min. Grind together fried red chilli, pepper corns, garlic, jeera and coriander seeds with 2½ tbsp water (refer notes).
Heat oil and add ground masala. Fry for 2-3 mins. Add sliced tomatoes and mix well. Cook till tomatoes become soft. Add tamarind pulp and salt. Mix well. Add 2 cups of water and coriander leaves. Let it boil, reduce the flame and simmer for 5-7 mins. Add a pinch of kayam.
Notes
Divs, asked me to coarsely grind the masala, but I almost made it into a smooth paste. The texture of the ground masala was between coarse and smooth.
This rasam is spicy and also the taste of coriander is dominating. Please adjust the measurements to suit your preference.
By now, you should know that chammanthi/chutney is one of my fav food items. The number of chammanthi recipes in this site is a testimony to that. But there is a slight difference to this chutney recipe. All the earlier chammanthi/chutney recipes are in katta chammanthi (solid) form which you can have with rice also. But this chammanthi/chutney is specifically for dosa, idli and the likes.
Here are the step by step pictures…
Grind together coconut, small onion, ginger, chilli powder, salt with 3-4 tbsp to a smooth paste…
Heat oil in a deep pan. Crackle the mustard seeds. Add finely sliced small onion and curry leaves. When onion turns golden brown, add coconut paste. Mix well. Add water. Mix well. Stir continuously until the steam comes through the spatula. Dont let it boil. It will take around 5-6 minutes…
Grind together coconut, small onion, ginger, chilli powder, salt with 3-4 tbsp water, to a smooth paste.
Heat oil in a deep pan. Crackle the mustard seeds. Add finely sliced small onion and curry leaves. When onion turns golden brown, add coconut paste. Mix well. Add ¾ – 1 cup of water. Mix well. Stir continuously until the steam comes through the spatula. Dont let it boil. It will take around 5-6 minutes.
Notes
You can also make green colour chutney using the same recipe. Instead of chilli powder, add 2-3 green chilli and follow the same recipe.
The consistency of this chutney is medium thick. Adjust the qty of water to suit your consistency requirements.
Make sure you cook the chutney on low flame and stir continuously, otherwise it will curdle/split.
Are you the kind of person who likes “adukki perukkal” (organising things)? I’ve seen many people who consider “adukki perukku” as a hobby and that includes my husband! You know what… it can be a pretty annoying hobby at times, not for the person who does it, but for poor souls like me who don’t enjoy the process very much. Normally I’ve seen the opposite, I mean it’s the ladies in the house who enjoys it and complains about the valichu variyidal (messing up) by the man of the house.
I think I should make something clear…. I’m not a messy person but at the same time I don’t have an OCD of organising things every now and then. I’m ok with some books and papers lying around here and there ;) There is nothing wrong with “adukki perukkal”, as long as you enjoy practicing the hobby by yourself, without any company, you know what I mean, right ;)
But I’ve to admit one thing, all this organising has some benefits too.. this recipe is the result of one such activity. Since there was some maintenance work to be done in the kitchen, I had to rearrange my cookery books. I rediscovered some cookery books and magazines. The photo of this recipe caught my attention at once and I decided to try it. I should say that the recipe compensated for the not so enjoyable part of rearranging the books.
Btw, are you a fan of Samvrutha Sunil, the Malayalam film actress? If so, there is one more reason to try this recipe. She shared this in one of the earlier issues of Vanitha Pachakam. I’ve given the quantity of ingredients based on my experiment and I’ve made some changes in the procedure, but the basic format of the recipe is same as hers. It’s a very spicy recipe loaded with flavour, that goes well with pulao, roti, appam, paratha etc; I do hope you will also enjoy this spicy treat.
Here are the step by step pictures..
Heat oil in a pan and add coconut, whole coriander, dry red chilli, whole black pepper, cloves, cinnamon, pearl onion, fennel seeds, curry leaves. Fry till the coconut turns golden brown. Remove from fire and let it cool. Grind the same without adding water. Keep it aside…
Heat oil in a pressure cooker and add sliced onions. When it turns golden brown, add ginger and garlic. Cook till the raw smell goes, around 2-4 mins…
Add chilli powder and cook for 2-3 mins. Add sliced tomato and cook till it turns soft…
Add cleaned mutton pieces and mix well. Add 2 cups of hot water and pressure cook till the mutton is done…
Open the pressure cooker, when the pressure drops. Add ¼ – ½ cup of hot water to the ground masala. Mix well. Add it to the cooked mutton and cook on low flame for 5-10 mins. Remove from fire…
Heat oil in a pan and add sliced pearl/small onion and curry leaves. Fry till the onions turn golden brown. Switch off the gas and add pepper powder and coriander leaves. Add this to the curry and mix well…
Heat oil in a pan and add coconut, whole coriander, dry red chilli, whole black pepper, cloves, cinnamon, pearl onion, fennel seeds, curry leaves. Fry till the coconut turns golden brown. Remove from fire and let it cool. Grind the same without adding water. Keep it aside.
Heat oil in a pressure cooker and add sliced onions. When it turns golden brown, add ginger and garlic. Cook till the raw smell goes, around 2-4 mins. Add chilli powder and cook for 2-3 mins. Add sliced tomato and cook till it turns soft. Add cleaned mutton pieces and mix well. Add 2 cups of hot water and pressure cook till the mutton is done. Refer notes to see on pressure cooking time.
Add ¼ – ½ cup of hot water to the ground masala. Mix well. Add it to the cooked mutton and cook on low flame for 5-10 mins. Remove from fire.
Heat oil in a pan and add sliced pearl/small onion and curry leaves. Fry till the onions turn golden brown. Switch off the gas and add pepper powder and coriander leaves. Add this to the curry and mix well.
Serve hot with rice/chapthi/pathiri etc;
Notes
This is a spicy recipe, so adjust the qty of spices to suit your taste.
I didnt add the pepper powder in the tempering stage, since the curry was already spicy for our preference.
Pressure cooking the mutton – After the first whistle, I reduced the flame to low-medium and cooked for 12-15 whistles. Keep it closed for another 15 mins or till the pressure drops.
The colour of the curry tends to darken as it rests..
Whenever I buy beef, it’s a challenge for me to try a new recipe with it. Being a hardcore fan of typical Kerala beef fry, I always end up making that. If you’ve ever tasted the Kerala beef fry, I’m sure you’ll agree with me. The very thought of it just makes my mouth water, huh!
Recently I had a chat with one of my veggie friends.. she was saying she turned veggie, after seeing a butchery very closely. For that matter, my Appa turned vegetarian at the age of 19, because of Ahimsa! Quite often, people are surprised when I tell them that my Appa is a vegetarian. Because a Nasrani (Christian) from Changanacherry, being a vegetarian is almost next to impossible for many! I also had similar feelings in the past but I never succeeded in becoming a vegetarian and I blame this beef fry. All my will power just vanishes with a snap, when a plateful of dark brownish blackish beef fry, flavoured with black pepper, curry leaves, thenga kothu (coconut bits) and coconut oil, do I need to say more?
Since it’s been ages I’ve posted a beef recipe here, I decided to try this recipe halfheartedly. Though beef fry still retains the top slot, this one is a close competition. It’s similar to the beef fry, but the fried coconut just gives a different flavour altogether. If you like beef, I recommend you try this recipe. You can have it as a starter or as a side dish. I had a bowl full of these while watching a movie ;)
Ready to roll with the recipe? Here you go with the step by step pictures…
Heat oil in a pan and roast the ingredients listed under ‘to roast and grind’ till it becomes golden brown in colour. Let it cool. Grind it to a fine powder without adding water…
Marinate the cleaned beef with chilli, coriander, turmeric powder, chopped onion, curry leaves and salt. Add ¼ cup water to this and pressure cook till beef is done (refer notes). If there is excess water, cook till it dries completely…
Heat oil in a pan and add the cooked beef, stir for a few mins. Add the ground masala. Add curry leaves and mix well. Cook till the beef is roasted well and the roasted powder starts separating from the beef…
Ginger & garlic – 1 – 1.5 tsp, each crushed/grated
Pepper powder – 1 tsp
Coconut oil
Salt
Curry leaves
To roast and grind
Grated coconut – ½ – ¾ cup (refer notes)
Whole black pepper – ½ tsp
Fennel seeds (perumjeerakam) – ½ tsp
Fenugreek seeds (uluva) – ¼ tsp
Cardamom – 4
Cloves – 5
Cinnamon – a small piece
Small/pearl onion – 10-12, sliced
Instructions
Heat oil in a pan and roast the ingredients listed under ‘to roast and grind’ till it becomes golden brown in colour. Let it cool. Grind it to a fine powder without adding water.
Marinate the cleaned beef with chilli, coriander, turmeric powder, chopped onion, ginger, garlic,curry leaves and salt. Add ¼ cup water to this and pressure cook till beef is done (refer notes). If there is excess water, cook till it dries completely.
Heat oil in a pan and add the cooked beef, stir for a few mins. Add the ground masala. Add curry leaves and mix well. Cook till the beef is roasted well and the roasted powder starts separating from the beef. Add pepper powder and mix well. Remove from fire and serve hot with rice/parotta.
Notes
I used ¾ coconut and thought it was a bit excess. However the flavour of this dish comes from the roasted coconut masala. So I recommend you to try this for the first time with ¾ cup coconut itself, unless you are on a strict diet or so ;)
I use Indian beef. Cook on high flame till the first whistle comes, then reduce the flame to low-medium and cook for another 10-12 whistles. Switch off the gas and let it remain closed for 20-25 mins.
Do a taste test before adding the pepper powder in the end, see the spice level and add it accordingly.
Which food item comes to your mind when you think of Christmas? Is it Fruit Cake and Wine or is it something like Appam & Stew? Ok, tell me.. do you have any crunchy munchy snacks like Diamond Cuts associated with Christmas? Now, this particular snack is something which my Ammachi (maternal grandmother) used to make. Ammachi used to make sharkkara varatti (jaggery coated chips) during Onam time and this chips during Christmas time. I remember eating them out of big aluminium dhabbas (containers) during my childhood. I had it very rarely after my Ammachi passed away.
During my recent trip to Kerala, my Amma made this. She got a “vazhakkula” and made banana chips, this one and sharkkara varatti(jaggery coated chips). I should say, it was a sight to see! As I’ve said before, Amma gets into the cooking mode very rarely. When she switches onto that mode, it’s almost like a kid playing with a new toy. The excitement is always sky high! The initial plan was just to make chips. But since I was roaming around the kitchen with my camera, her excitement doubled and she got the idea of making this. Immediately, a few calls were made to her sisters to get the technical know how of it and she swung into action.
I actually felt like clicking her pictures to capture the various expressions. When these chips took it’s final shape, her face was beaming with pride, excitement and happiness. I’m not sure whether it’s the result of simple joy that cooking gives you or the joy of being able to recreate something that her mom used to make! After all food is always served with a plateful of memories on the side, right? Her excitement didnt end in the kitchen. Whoever visited our home after that, got a taste of these chips along with a generous share of her excitement :)
Well, it tasted great! She packed a small batch for Jose also and after tasting it, he didnt even allow me to touch the packet! I managed to keep aside a few, so that I can take some pictures and share it with you too. Here you go Amma, this post is for you! May the joy of cooking fill your life more often ;)
May be you can try this sugar coated chips instead of sugar cookies for a change, what say, my friend :)
Step by step pictures…
Cut the peeled plantains into oval shaped slices. Sprinkle salt and turmeric powder and give it a good shake.Heat oil in a deep pan/wok. When oil is hot enough, add the sliced plantains. Stir in between and make sure the chips arent sticking together. Fry till it turns crispy.The chips should be slightly crispier than the normal banana chips. Remove it from the oil using a slotted spoon and drain on a tissue paper.
Heat together the sugar and water in a pan. When the sugar has melted completely and the syrup has reached single thread consistency, remove from fire. Stir continuously for 2 more mins and add crushed cardamom…
Add chips to the syrup and make sure that all the pieces are coated well with the syrup. Spread out the chips in the pan itself and allow the sugar to crystallise…
Panchasara Varatti (Banana Chips Coated with Cardamom Flavoured Sugar Syrup)
Author: Maria Jose
Recipe type: Snacks
Cuisine: Kerala
Prep time:
Cook time:
Total time:
Serves: 3-4
Ingredients
Raw green plantains – 500 gms (2 large)
Turmeric powder – ¼ – ½ tsp
Sugar – 100 gms
Water – 50 ml
Cardamom – 4-5
Sugar – 1 tsp
Salt
Oil – for deep frying
Instructions
Peel the plantains and soak them in water for a min or two. Pat them dry using a clean kitchen towel. Cut them into oval shaped slices. It should be slightly thicker than the normal banana chips (refer the step by step pics). Sprinkle salt and turmeric powder and give it a good shake.
Heat oil in a deep pan/wok. When oil is really hot,reduce the flame to medium-high and add the sliced plantains.You can add one slice and check whether the oil is hot enough. Make sure you dont overcrowd the pan. You can fry it in 2-3 batches, depending on the size of pan, you are using.
Stir in between and make sure the chips aren’t sticking together. Once the chips are ready, it will make a specific sound, when you stir it. After hearing that sound, reduce the flame to medium and cook for a few more mins. This chips should be slightly crispier than the normal banana chips. Remove it from the oil using a slotted spoon and drain on a tissue paper. Let it cool completely.
Check out Annita’s post to see a detailed version of making banana chips (http://deepann.wordpress.com/2008/08/19/vaazhakka-upperiplantain-chips/)
Powder the cardamom along with 1 tsp of sugar in a mixie.
Take a wide pan and add sugar and water. When the sugar melts completely and reaches one thread consistency (refer notes for details) remove it from fire. Keep stirring continuously for 2 more mins and add crushed cardamom powder and chips. Keep stirring it, till all the pieces are well coated with the sugar syrup. Make sure the chips aren’t sticking together, separate it using a fork, if it’s sticking together. Spread it out in the pan itself and let it cool. Once it’s cooled completely and the sugar has crystalised, store it in an airtight container. It keeps well for 2-3 weeks.
Notes
The qty of sugar mentioned in the recipe, gives a thick sugar coating. If you prefer a thin coating of sugar, adjust the qty of sugar accordingly.
To check whether the sugar syrup has reached single thread consistency, drop the syrup in a few drops of water in a bowl. If you are able to roll the syrup into a non sticky ball, then the syrup is ready. Please check out the following link to see the detailed pics:
http://www.spiceindiaonline.com/boondi_laddu_0/
Though I’ve mentioned in the recipe to make sure that the chips dont stick together, it’s ok even if they do.
The season of lent has started and so has the request for posting vegetarian recipes :) I’m sharing the recipe of one of my absolute favorite veggie dishes, chena mezkukkuperatti. I’m not sure how and when my love affair with this dish started, but it’s a relationship that I cherish very much. I’m surprised that it took me this long to post the recipe here. Anyways, without further ado, I’ll introduce you to this wonderful dish. I must tell you that it’s supposed to be a super healthy food.
Hope you too will also enjoy it as much as I do..
Step by step pictures…
Heat oil in a pan and crackle the mustard seeds. Add the crushed small onion and garlic and curry leaves. Fry it till it turns golden brown. Add chilli,turmeric, pepper and fennel powder and salt. Fry it till the raw smell goes, about 2 mins…
Add hot water and mix well. Add cooked chena and mix well. Make sure the chena pieces are coated well with masala. Continue to cook on low flame for 5-10 mins, stirring in between,till it is roasted well.
Chena/Suran (Elephant Foot Yam) – 400gms, cut into bite size pieces (measured after cleaning)
Whole small onion – ½ cup
Whole garlic – 3, big cloves
Red chilli powder – 2-21/2 tsp
Turmeric powder – ¼ tsp
Pepper powder – ½ tsp
Fennel (perumjeerakam) powder – a pinch
Hot water – 2 tbsp
Mustard seeds – ¼ -1/2 tsp
Salt
Curry leaves
Coconut oil
Instructions
Cook the cleaned chena pieces with salt till it’s tender (refer notes). Make sure you dont overcook them. It should retain a crunchy texture.
Crush together the whole garlic and whole small onion using a mortar and pestle. Keep it aside. Heat oil in a pan and crackle the mustard seeds. Add the crushed small onion and garlic and curry leaves. Fry it till it turns golden brown.
Add chilli,turmeric, pepper and fennel powder and salt. Fry it till the raw smell goes, about 2 mins. Add hot water and mix well. Add cooked chena and mix well. Make sure the chena pieces are coated well with masala.
Continue to cook on low flame for 5-10 mins, stirring in between,till it is roasted well. Remove from fire and serve hot with rice.
Notes
Since the chena I get in Bahrain, cooks in no time, I usually cook it on stove top, by boiling it with water and salt. Be careful while adding salt the second time, since chena is already cooked with salt.
What’s your favorite side dish for Nei Choru (Ghee rice)? Let me guess… it’s a non veg dish, right?. Have you tried ghee rice with Parippu Curry (Dal Curry)? I’ve read in some books, that Dal and Ghee Rice combo is very common in Malabar side. That combo sounded a bit strange to me at first, since I always associated nei choru with non veg side dishes. But I happened to try this combo and I was pleasantly surprised! It paired so well, not to mention the added taste of pappad and some pickle on the side. It was a beautiful and satisfying meal.
This is the kind of dish that you can cook during a weekend for your family. It guarantees you a very special treat with not much effort. Sounds tempting, right?
I’ve given the simplest form of ghee rice recipe which I got from my friend Sheena. Thank you Sheena :)
So here’s my take on the side dishes for ghee rice…
Kaima/Jeerakasala rice – 1 cup (refer notes for substitution)
Onion – 1 small, chopped finely
Cloves – 3
Cardamom – 3
Cinnamon – a small piece
Bay leaf – 1
Salt
Boiling water – 1¾ – 2 cups (refer notes)
Ghee – 2 tbsp
For Garnishing
Onion – 1 small, sliced finely
Cashews & raisins – 5-10, each
Oil/Ghee
Instructions
Wash the rice well. Crush together cloves, cinnamon and cardamom. Heat ghee in a wide and deep pan. Add crushed masala and fry for a min or two. Add chopped onion and fry till it becomes pink in colour. Add the washed rice and fry for 5-7 mins on low flame. Stir in between. Add salt and boiling water. Cover and cook on low flame till the water is dried completely and rice is cooked.
Heat oil/ghee in a pan and fry the cashews and raisins till it turns golden brown. In the same oil, fry the sliced onion, till it becomes golden brown.
Garnish the cooked rice with fried onions, cashew and raisins.
Serve with Parippu Curry (dal curry) or any veg or non veg curry of your choice and pappad. Curries that has a thick and rich gravy pairs well with ghee rice.
Notes
Kaima rice is a short grain rice, which is commonly used in Malabar area for making biriyani and ghee rice. You can use Basmati rice instead. The ideal qty of water to cook the rice is double the qty of rice. However kaima rice tends to cook faster, so I added only 1¾ cup of boiling water. If you want the rice to be separate and non sticky, I suggest you add 1¾ cup water first and add more boiling water, if required. Also, in some places people add mint and coriander leaves, lemon juice etc to ghee rice. You can add the leaves either at the end for garnishing or along with the onions. If you are using lemon juice, you can add around 1 tbsp of lemon juice along with salt and water.
Unlike previous years, this year I was very sure about what to post as Easter Special. For a change, I planned things in advance ;)
Savoury version of Pidi (Rice dumplings) was something new to me. We make a sweet version of it called as Unda Payasam as evening snack. The very first time I had savoury/spicy pidi was in Bombay, at one of our family friend’s house. But there the pidi was served on the side with chicken curry. The second time I had the savoury version was a few months ago, when my friend Sheena made it. The dish was loaded with flavour. This is a Malabar / Calicut version of Pidi. I guess the core part of the masala, ie the roasted coconut gravy remains the same in all the versions. Sheena was kind enough to come home and cook this dish, so that I can take the step by step pictures and share it with you. Thanks a ton dear :)
This is a one pot dish like biriyani. You can have it for breakfast, lunch or dinner. Suit yourselves ;) It’s kind of a lengthy procedure when you look at the recipe as a whole. So do one thing, break it into different parts and I’m sure you’ll breeze through it. Though I’ve given the beef version, you can make it with chicken, mutton or even prawns. Anyways, my fav is the beef one!
I’m posting this recipe in advance, so that you can plan things accordingly. I very strongly recommend you to try this one, trust me, you are in for a treat my friend.
Wish you and your loved ones a Happy Easter! May the Lord Bless you abundantly! Have a great time with your loved ones :)
So here you go with the step by step recipe..
Add coconut, small onion paste and salt to rice flour. Mix well. Add hot water gradually and make a soft and non sticky dough…
Make small balls of dough almost equivalent to the size of a 50 paisa coin. Make a small dip in the ball, using your thumb. Steam these balls in low-medium heat for 8-10 mins…
Add sliced onion, chilli, turmeric, coriander powder, ginger & garlic, salt, curry leaves and water to the beef. Pressure cook the beef …
Heat oil and add chopped onion. When it becomes soft, add small onion…
When the onions turn golden brown, add ginger and garlic. Cook for 2-3 mins. Add masala powders and mix well. Cook till the raw smell goes, around 2-3 mins…
Add chopped tomato and green chilli and salt. Cook till the tomatoes become soft. Add this masala to the beef and mix well. Keep cooking the beef on low flame…
Heat oil and add grated coconut, chopped garlic, fennel seeds, turmeric powder and curry leaves. Fry it till the coconut turns golden brown in colour. Let it cool completely. Grind it to a smooth paste without adding water. Add the ground coconut paste to the beef mixture. Combine and keep cooking on low flame…
Add half of the cooked pidi and half of the thick coconut milk to this. Mix. Add the rest of the cooked pidi and coconut milk. Give a good mix and bring it to boil. It has semi dry consistency and the pidi, should be coated well with the masala. Add more hot water, if required, to adjust the consistency…
Beef – 1 kg, cut into bite size pieces (refer notes for chicken/mutton/prawn option)
Onion – 1 medium, sliced
Chilli Powder – 2½ tsp
Coriander Powder – 2½ tsp
Turmeric Powder – ½ tsp
Crushed ginger and garlic – ½-1 tsp, each
Water – ¾ cup
Salt
Curry leaves
For Masala
Onion – 2 medium, chopped
Small onion – 15, sliced
Crushed/grated ginger and garlic – 1 tbsp each
Tomato – 1 medium, chopped
Green chilli – 2-3, chopped
Coriander Powder – 2 tsp
Chilli Powder – 1½ – 2 tsp
Turmeric powder – ¼ tsp
Salt
Thick coconut milk – ½ – ¾ cup
To Roast and grind
Grated coconut – 1.5 cups
Chopped garlic – 2 tsp
Fennel seeds – ¼ tsp
Turmeric powder – ¼ tsp
Curry leaves
Instructions
Pidi Preparation
Grind together small onion and fennel seeds (qty mentioned under”for pidi”) to a coarse paste. If coconut is not finely grated, just pulse it in mixie for a second.
Add coconut, small onion paste and salt to rice flour. Mix well. Add hot water gradually and make a soft and non sticky dough.
Make small balls of dough almost equivalent to the size of a 50 paisa coin. Make a small dip in the ball, using your thumb.This is done, so that the gravy seeps into the pidi. Steam these balls in low-medium heat for 8-10 mins. We steamed the above qty in 3 batches. Keep aside the prepared pidi/dumplings.
Beef Preparation
Add sliced onion, chilli, turmeric, coriander powder, ginger & garlic, salt, curry leaves and water to the beef. The qty of spices is mentioned under “for beef” title in ingredients list. Pressure cook the beef. Make sure that the beef retains a crunch and not fully cooked. We will be cooking it further. Once the pressure releases, continue to cook the beef on lowest flame, while you make the masala. Stir it in between.
Masala Preparation
Heat oil and add chopped onion. When it becomes soft, add small onion. When the onions turn golden brown, add ginger and garlic. Cook for 2-3 mins. Add masala powders and mix well. Cook till the raw smell goes, around 2-3 mins. Add chopped tomato and green chilli and salt. Cook till the tomatoes become soft. Add this masala to the beef and mix well. Keep cooking the beef on low flame. Make sure you stir it in between..
Heat oil and add grated coconut, chopped garlic, fennel seeds, turmeric powder and curry leaves (qty mentioned under “to roast and grind”). Fry it till the coconut turns golden brown in colour. Let it cool completely. Grind it to a smooth paste without adding water.
Add the ground coconut paste to the beef mixture. Combine and keep cooking on low flame.
By now, the gravy of the beef should be reduced to ⅓rd or ¼th of the original qty. Add half of the cooked pidi and half of the thick coconut milk to this. Mix. Add the rest of the cooked pidi and coconut milk. Give a good mix and bring it to boil. It has semi dry consistency and the pidi, should be coated well with the masala. Add more hot water, if required, to adjust the consistency.
Garnish with fried small onion and serve hot.
Notes
You can refrigerate the dish for 2-3 days. Add some water while reheating. It’s better to reheat on stove than microwave. If you find the process too lengthy and tiresome, you can prepare the beef in advance and refrigerate. If there is a delay in steaming the pidi, after making dough, make sure you cover the dough with a wet cloth. Pressure cooking the beef – After the first whistle on high flame, I reduce the flame to low-medium and cooked for 5 more whistles. Keep it closed for 15-20 mins. You can also make this with chicken, mutton and prawns. It’s better to use boneless chicken and mutton. If you are making it with chicken, there is no need to pressure cook. If you are making it with prawns, you can cook the prawns in the masala and avoid the pressure cooking part of the recipe. But make sure to increase the qty of masala ingredients accordingly.
Do you have withdrawal symptoms if you dont get to taste something sweet after lunch or dinner? I’ve seen some people eating spoonfuls of sugar, just like that, to satisfy the urge. Though I don’t go to such dire situations, I crave for something sweet at times. This payasam happened on one such day.
Earlier I used to stock up something sweet all the time, but recently I’ve stopped that to form a healthy eating habit. These days, I snack dates or dried figs, when I feel like eating something sweet. But some days, I’ve this unstoppable itch to cheat. On such days, this is my go to recipe. It’s a quick fix dessert. It’s ready in less than 10 mins!
That reminds me… I should tell you something. Whenever I make the usual style of porridge with oats, it just tastes yucky! I know it’s not an adjective you expect to see on a food blog. But that’s the truth. Since there is so much of hype about “oats” these days, I wanted to include it somehow in our food. This payasam style suits me the best! I’m a big fan of anything with jaggery and coconut milk. From my experience, you can never go wrong with that combo.
Usually I don’t follow any particular measurements while making this, I just throw in whatever I feel like. But, since I wanted to share this with you, I noted down the measurements last time. Still, I’d suggest you to use this recipe as a guideline and you can work on it as you go, to suit your requirements. It’s an ideal recipe if you are looking for some healthy and nutritious dishes for your kids. I think they will like the smooth texture and sweetness of the dish. All in all, I’d say this recipe is definitely value for your time and effort, not to forget the money part too ;)
Since it’s a payasam recipe, I thought I’ll post this as Vishu special. Also, it’s my parents wedding anniversary on Vishu day. If there is one thing that they both agree unanimously, it’s sweets, especially payasam ;) They both have sweet tooth big time, so this post is for them too. Appa and Amma, wish you a very happy anniversary!
Wish you a Happy Vishu!
Here are some recipes for Sadya, if you are planning to make one.
Add ⅓ cup water to the jaggery and melt it. Strain the melted jaggery. Add oats to the strained jaggery. Cook till the jaggery is dried up. Add medium thick coconut milk, bring it to a boil. When it starts to thicken, add crushed cardamom and thick coconut milk. Stir well. Cook on low flame for 5 mins.
Heat ghee in a pan and fry the cashews and coconut bits, till it turns golden brown. Add this to the payasam and serve hot.
Notes
Usually I dont add cardamom, cashew, ghee and coconut bits. Also, I use only medium thick coconut milk. I use maggie coconut milk powder to make this. You can adjust the qty of coconut milk to suit your requirements. Please keep in mind that it thickens as it rests, so adjust the consistency accordingly. If you are making it for kids, you can increase the qty of ghee.
Are you a breakfast person? By breakfast I mean a proper breakfast and not just a glass of milk or an apple. I’m very much a breakfast person. I need to eat something heavy in the morning to have a proper start to my day. It’s been like that from my childhood days.
Even during school/college days , I didnt mind getting up early, to have breakfast on time. That reminds me… my Amma never had a tough time with both, my brother and myself, when it came to food. Her policy was this.. if you are hungry you’ll eat the food no matter what it is or how it is. Somehow that policy worked well with us. We were never forced to eat, actually on the contrary we were asked not to eat too much ;)
So coming back to breakfast… These days I prefer a long breakfast outside, to a lunch or dinner. I can eat all I want and not worry about stuffing up myself, since the whole day is left to burn out the calories ;)
Some of my all time favourite dishes are also breakfast items, like Appam and Stew or Puttu and Chicken Mappas. In this recipe I’ve combined two things which I like best, Puttu and Beef :) If you like these two items, I’ve only one thing to say “Make it already!”
We had it just like that without any side dish, but I think Veg Stew is a good choice for this, if you prefer a side dish.
Step by step pics..
Add salt to the puttu podi and mix well. Add water little by little till the powder becomes moist/wet. Add half of the grated coconut to this & mix well. If too much of lumps is formed just run it in your blender/food processor for a few seconds. Keep aside the puttu mix for 10 minutes…
Heat oil in a pan and add the chopped onions. When it turns golden brown, add chopped tomato and salt. Cook till the tomato becomes soft…
Add crushed pepper and garam masala. Mix well. Add shredded or minced meat and mix well…
Add around 1/4 cup of hot water, just to bring everything together. Cook till the water dries. Add chopped coriander leaves and mix well…
Put one tbsp of coconut as the first layer. Add 2 tbsp of meat masala as the second layer. The third layer should be 4-5 tbsp of puttu mix. Repeat the process, till the mould is filled. Make sure that the mould is not tightly packed. Cover the mould with the lid. Fill water in puttu kudam (pot). Place the puttu kutti on puttu kudam. Cook it on medium flame for around 5-7 minutes…
Add salt to the puttu podi and mix well. Add water little by little till the powder becomes moist/wet. Add half of the grated coconut to this & mix well. If too much of lumps is formed just run it in your blender/food processor for a few seconds. Keep aside the puttu mix for 10 minutes.
For Meat Masala
Shred or mince the cooked meat. Heat oil in a pan and add the chopped onions. When it turns golden brown, add chopped tomato and salt. Cook till the tomato becomes soft. Add crushed pepper and garam masala. Mix well. Add shredded or minced meat and mix well. Add around ¼ cup of hot water, just to bring everything together. Cook till the water dries. Add chopped coriander leaves and mix well.
Filling the puttu kutti (mould/maker)
Put one tbsp of coconut as the first layer. Add 2 tbsp of meat masala as the second layer. The third layer should be 4-5 tbsp of puttu mix. Repeat the process, till the mould is filled. Make sure that the mould is not tightly packed. Cover the mould with the lid. Fill water in puttu kudam (pot). Place the puttu kutti on puttu kudam. Cook it on medium flame for around 5-7 minutes. Serve hot/warm with curry of your choice.
Notes
To check the wetness/moistness of the puttu mix, just press the moistened/wet flour and see if they hold together. You can use any puttu podi for this, white, brown etc; I’ve used Samba wheat puttu podi here. You can increase or reduce the qty of coconut to suit your requirements. I had some left over of cooked beef which I made for beef fry. You can cook the beef with salt, chilli, coriander powder, garam masala, ginger and garlic. If you are using chicken, it’s better to use boneless chicken. If you dont have puttu maker, you can use Idli steamer to make this.
The dish that evokes a bundle of fond memories in me. The dish that holds a special place in my heart, mainly because of the memories associated with them. I’m sure you might also have similar experience if you grew up having this spicy snack. Now coming to think of it, I cant remember a single time when I’ve had this snack alone, there was always somebody with me to share this. I’ve had these cutlets mostly from BTH hotel in Ernakulam and I’ve shared it most of the times with my amma.
BTH was one of our favourite eat outs. I used to go to Amma’s office straight from college, wait there impatiently (most of the times) for her to leave. The only thought that made the waiting worthwhile was the promise of these cutlets and coffee from BTH. Both of us had a fixed choice, which remains the same even today. Amma always order Chole Bhatura and I order Veg Cutlets. The funny thing is, the moment our orders are placed before us, our hands will be in each others plate. After we wash down our food with a cup of coffee, we start looking around the place. After observing the people around for sometime, Amma would come up with life stories for every person there. She is very good at it :) Most of the times I silently listen to her stories and try to imagine those people’s lives based on her stories. Sometimes I contradict her stories and share my version. Even today we continue this ritual. If we are going to the city , before reaching half way, Amma would ask me “ninakku kappi veno?” (do you want coffee?) That’s the cue for our trip to BTH ;)
Fast forward to present days and still I’m sharing a plateful of this wonderful snack with somebody. Sometimes during weekends, we crave for a spicy fried snack. On such days, Jose and myself end up in Swagat Hotel inside the Bahrain Souk. It’s a kutti (small) hotel, but it’s packed all the time. The whole scene there reminds me of Indian Coffee House. We both try to get a seat in the corner and have the hot cutlets, all the while sharing our nostalgic memories of times when we used to have it with our parents. For Jose, each trip to Sagar Hotel is nostalgic. Growing up in Bahrain, this hotel reminds him of his childhood days, when he used to visit the place with his parents as part of their weekend outing.
So here’s to reliving old memories as well as creating new ones for the coming days. I’ve tried to make this cutlet similar to the ones that we get in restaurants/bakeries in Kerala. You can use this as a base and customise it to suit your taste requirements or shall I say memories :)? You can have this as an evening snack or as a veggie appetizer. One thing I like about the cutlets is that, you can make it in advance and it comes in handy, when you are short of time.
Step by step pictures…
Heat oil in a wide pan. Add the chopped onion and cook till it becomes soft and starts browning. Add chopped ginger, garlic and green chilli. Cook for 2-3 mins or till the raw smell goes…
Add all the masala powders and mix well. Cook for another 2-3 mins. Add the cooked veggies and salt, mix well…
Add chopped coriander leaves. Combine and continue to cook for 5 more mins on low flame.Let the veggie mixture cool completely…
Add the mashed potatoes to the veggie mixture and mix well.Make sure there are no lumps…
Make a medium thick paste with plain flour and water. Mix together the bread crumbs and rava (if using)…
Dip the shaped cutlets in this batter & roll in bread crumbs…
To fry the cutlets, heat oil in a pan on med – high flame. When the oil is really hot (not smoking) add the cutlets & fry it till its golden in colour. Drain on a paper towel…
Boil and mash the potatoes. Let it cool completely.
Microwave the chopped veggies at 100 % power for 4-5 mins. You can steam it on stove top also, instead of using MW.
Heat oil in a wide pan. Add the chopped onion and cook till it becomes soft and starts browning. Add chopped ginger, garlic,green chilli and curry leaves. Cook for 2-3 mins or till the raw smell goes. Add all the masala powders and mix well. Cook for another 2-3 mins. Add the cooked veggies and salt, mix well. Add chopped coriander leaves. Combine and continue to cook for 5 more mins on low flame.
Let the veggie mixture cool completely. Add the mashed potatoes to the veggie mixture and mix well.Make sure there are no lumps. Shape the mixture as per your liking.
Make a medium thick paste with plain flour and water. Mix together the bread crumbs and rava (if using). Dip the shaped cutlets in this batter & roll in bread crumbs. At this stage the cutlets are ready to freeze. You can store it in a ziplock bag & freeze it for 1-2 months. Keep the frozen cutlets at room temp for 30-45 mins before frying.
To fry the cutlets, heat oil in a pan on med – high flame. When the oil is really hot (not smoking) add the cutlets & fry it till its golden in colour. Drain on a paper towel & serve hot with tomato ketchup.
Notes
I used carrot, beans, cabbage and beetroot for the cutlet. I chopped all the veggies together in food processor.
I got around 35 cutlets from the above qty. I added rava to the breadcrumbs for an extra crunch.
If you dont mind using eggs, you can make a batter with egg whites and plain flour to coat the cutlets. You may need 2 egg whites for the above qty.
I prefer deep frying the cutlets to shallow frying. I always end up with more oil in cutlets when I shallow fry them. Make sure the heat is adjusted well, so that the cutlet doesnt absorb any oil. Set the correct heat level by testing with one or two cutlets in the beginning.
Some of the ironies in life can be best explained in terms of food, dont you think so? I happened to read an article recently about how Mumbai has developed a mania for Sunday brunch. It seems people are spending around $ 40-80 per person for a Sunday brunch! According to the magazine this trend reflects rising numbers of wealthy people. Well it is said about Mumbai that you can live there with 5 rs per day or 50 K, rs per day. The magazine further goes on to say that this idea of brunch is unimaginable for the millions of Mumbaikars who live below the poverty line.
Well, what got me interested was the ending of the article. Inspite of this so called “Sunday brunch mania” , hotels admitted losing money on those brunches. Here’s the irony, for the rich, the problem is their waistline! Those who can afford, can’t eat and those who can eat, can’t afford!
Coming to think of it, the star of our dish “kappa” also has a shade of irony attached to it. Kappa (tapioca) used to be considered as poor man’s food. It was a good starchy substitute for rice for those who cant afford rice. But over a period of time, it got transformed from poor man’s staple to an exotic dish. There is a star hotel in Cochin, which has a party hall with thatched roof outside the main building. I’m not sure whether it’s still there. I remember seeing this hotel’s advertisements in newspapers during my school/college days. They used to have “Thattukada (street food) food festival” in this party hall. Now when I look back, I can see the irony in it. People are paying exorbitant prices to eat poor man’s food in a thatched roof hall!
Talking about ironies in life, the biggest irony for me is… I’m not a foodie in the true sense of the word and I’ve been running a food blog for 7 years! There are days in which my mind keeps wandering and I feel like floating in the ocean without knowing where I’m heading. On such days I’d like to have some comfort food, just to anchor my thoughts somewhere, while I put together the pieces. Kappa and Fish curry, is a kind of food that soothes me. May be because it helps me to feel connected to my roots again, when I’m confused about my identity.
I like my kappa vevichathu to have a smooth almost buttery like texture, with an extra crunch added by the coconut. Not to mention the fiery red fish curry on the side to balance the whole dish :)
Magazine Data from The Economist (July 6th – July 12th 2013)
Add water and salt to cleaned tapioca. The water level should be 2-3 inches higher than tapioca. Bring it to a boil and reduce the flame to the lowest. Cook till the tapioca is done. Drain the excess water. Mash the tapioca well.
Combine coconut, small onion, green chilli, garlic, jeera, curry leaves and turmeric powder using your finger tips (njeraduka). Make a well in the centre of the mashed tapioca and add coconut mixture. Cover it with tapioca. Cover and cook it for 5 – 7 mins on low flame.
Heat oil in a pan and crackle the mustard. Add sliced onion and curry leaves. When onions turn light golden, add coconut and fry it, till it becomes golden brown. Add this to the cooked tapioca and mix well.
Add water and salt to cleaned tapioca. The water level should be 2-3 inches higher than tapioca. Bring it to a boil and reduce the flame to the lowest. Cook till the tapioca is done. Drain the excess water. Mash the tapioca well.
Combine coconut, small onion, green chilli, garlic, jeera, curry leaves and turmeric powder using your finger tips (njeraduka).
Make a well in the centre of the mashed tapioca and add coconut mixture. Cover it with tapioca. Cover and cook it for 5 – 7 mins on low flame. Mix it well. You can drizzle some coconut oil at this stage, if you like.
Heat oil in a pan and crackle the mustard. Add sliced onion and curry leaves. When onions turn light golden, add coconut and fry it, till it becomes golden brown. Add this to the cooked tapioca and mix well.
You can adjust the qty of coconut to suit your taste and health requirements. You can store this in fridge for 2 days. It’s better to re heat it on stove top than microwave.
It’s been a few months since I’ve posted a chicken recipe. It’s not that I didn’t try any new chicken recipes in between. In fact I did try quite a few recipes. Well, you’ll get to know about those recipes soon ;)
What attracted me to this particular chicken recipe is that it doesn’t use coconut in any form, unless you count coconut oil. I’ve been getting requests for chicken recipes without coconut. This recipe ticks that column. Secondly it’s a pretty simple recipe yet high on flavour. Though it has a rich masala, the taste of masala isnt overpowering. All the spices come together and blends so well to give it a balanced taste. Ok, that’s it… I’m not describing it anymore. Why dont you try it yourself and see whether you agree with me or not ;)?
Here you go with the step by step pictures and the recipe…
Grind together cinnamon, cardamom, cloves, fennel seeds, pepper, chilli powder, coriander powder and turmeric powder with 3-5 tbsp of water to a smooth paste… Marinate the chicken pieces with the ground masala, grated ginger and garlic, vinegar, salt and curry leaves… Add hot water to the marinated chicken. Mix well. Bring it to a boil and reduce the flame. Cover and cook till the chicken is done and the gravy is reduced. There should be around 1/4 cup of gravy remaining… Heat oil in a pan and add sliced small onion and curry leaves. Fry it till the small onion turns golden brown… Add the cooked chicken along with the gravy. Cook it on low flame for 7-8 mins, till the gravy is almost dried and the chicken pieces are coated well with the masala. Remove from gas…
Grind together cinnamon, cardamom, cloves, fennel seeds, pepper, chilli powder, coriander powder and turmeric powder with 3-5 tbsp of water to a smooth paste.
Marinate the chicken pieces with the ground masala, grated ginger and garlic, vinegar, salt and curry leaves. Add hot water to this. Mix well. Bring it to a boil and reduce the flame. Cover and cook till the chicken is done and the gravy is reduced to ¼ cup.
Heat oil in a pan and add sliced small onion and curry leaves. Fry it till the small onion turns golden brown. Add the cooked chicken along with the gravy.
Cook it on low flame for 7-8 mins till the gravy is almost dried and the chicken pieces are coated well with the masala. Stir in between. Remove from gas.
Notes
Though I’ve used coconut oil in this recipe, you can use any oil that suits your requirements. However for authentic Kerala taste, Coconut oil is the best. The dish has no gravy, but if you prefer you can adjust the consistency to suit your requirements.
Onam is around the corner, right? You can expect some sadya recipes here in the coming weeks. Let’s start with one of my fav item in sadya, Kalan. Wait there is some correction in the previous sentence, my first and foremost fav item in sadya is payasam, especially jaggery based payasams. I’m craving some payasam as I write this, sigh! What about you? Do you have any favourite sadya dish?
Anyways, coming back to our kalan recipe… I like yogurt based curries with rice, may be that explains my love for Kalan. I think it has different versions including different types of plantain/banana and other veggies. I’ve used raw green banana in this recipe. You can also make it with medium ripe plantain (Kerala banana) if you like mildly sweetened kalan.
So shall we go and make this yummy dish?
Cook the diced banana, with sliced small onion (2), chopped green chillies, ginger, garlic and salt. Bring it to a boil and let it simmer till the banana is cooked…
Grind together coconut, cumin and turmeric powder with 3-5 tbsp of water to a smooth paste. Start grinding with 2-3 tbsp of water and add more if required. Add this to the whisked yogurt…
Combine the whisked yogurt and coconut paste. Remove the cooked banana from fire and add the yogurt coconut mixture. Mix well. Bring it back to fire and let it simmer. Stir continuously until steam comes from the back of the spoon, around 5-7 mins…
Heat oil in a small pan and crackle the mustard seeds. Add sliced small onion (3) and curry leaves. Fry it till the small onion turns golden brown. Add this to the curry…
Raw Banana (Vazhakka/Pachakaya) – 1.5 cups, cubed/diced
Small onion – 2, sliced
Green chilli – 3, chopped
Chopped ginger and garlic – ½ -1 tsp each
Water – 1 cup
Coconut – 1 cup
Cumin (jeera) – a pinch
Turmeric powder – ½ tsp
Whisked yogurt – 3 cups @ room temp
Small onion – 3, sliced
Mustard – ½ tsp
Curry leaves
Salt
Coconut oil
Instructions
Cook the diced banana, with sliced small onion (2), chopped green chillies, ginger, garlic and salt. Bring it to a boil and let it simmer till the banana is cooked.
Grind together coconut, cumin and turmeric powder with 3-5 tbsp of water to a smooth paste. Start grinding with 2-3 tbsp of water and add more if required.
Combine the whisked yogurt and coconut paste. Remove the cooked banana from fire and add the yogurt coconut mixture. Mix well. Bring it back to fire and let it simmer. Stir continuously until steam comes from the back of the spoon, around 5-7 mins.
Heat oil in a small pan and crackle the mustard seeds. Add sliced small onion (3) and curry leaves. Fry it till the small onion turns golden brown. Add this to the curry.
Notes
You can also use medium ripe ethakka (Kerala banana) to make this. I’ve seen some people using a combination of vazhakka and ethakka.
Also in some places chena (yam) is also added along with banana to make kalan. The gravy tends to thicken as it rests. While reheating, it’s better to use double boiler method, otherwise it may curdle.
Have you heard people saying, “it’s complicated”? Can I share a secret with you? Sometimes when I hear people say it, I wonder whether they make it up. Ok, before you start raising your eyebrows, let me explain.
I think I need to put a disclaimer before going on with the explanation. I’m just thinking out loud here. So these are just my thoughts, it can be right or wrong, but I’m sharing it with you as it is. I think, these days we have a tendency to “glorify” each and every little thing we do. (I’m guilty as charged.) We try to portray each and every thing in our life, even mundane things sound exciting/eventful/adventurous. Yes, you can say we are celebrating life, that’s one way to look at it.
At times, I feel when we are so engrossed in the process of glorification, we are missing out on simpler things in life. We want to make everything a larger than life experience, everything “happening”. So when somebody asks how’s life, instead of saying “just going on, as usual”, we tend to say “great! but it’s complicated”. We dont want the other person to have an impression that we are leading a simple, routine ,uneventful, stable life. There is no excitement in it.
But honestly, I think it’s way more difficult to lead a simple life than an exciting one. To find “excitement” in simple things is a challenge in itself. What do you think?
Anyways, all I wanted to say was that this dal curry is as simple as it gets. There are no exciting ingredients or methods to follow. Pretty straight forward recipe with a simple set of ingredients. But the end result never fails to give you a warm embrace. Just the kind you want… to let you know, everything will be ok in the end, even if it’s complicated :)
Though this recipe looks similar to “Parippu Curry” which I’ve posted earlier, it tastes different. The addition of garlic and fennel seeds gives a different flavour. Also this curry goes well with rice and roti too.
Here’s the recipe for you…
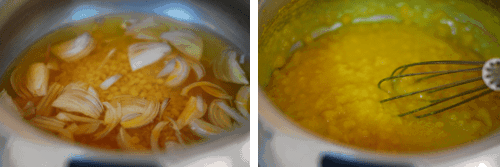
Wash toor dal and pressure cook it with 3 cups water, sliced onion and turmeric powder, until dal becomes soft…
Add the coconut paste to the cooked dal, mix well. Add chopped tomato and 1- 1.5 cups hot water. Let it cook for 5-7 mins on low flame. Switch off the gas…
Heat oil in a pan and crackle the mustard. Add small onion and curry leaves. When the small onion starts changing colour, add green chillies. Fry it till the small onion turns golden brown. Add this to the dal and mix well.
Wash toor dal and pressure cook it with 3 cups water, sliced onion and turmeric powder, until dal becomes soft (refer notes).
Grind together coconut, fennel seeds, chopped garlic, 3-4 tbsp of water and salt to a smooth paste.
Add the coconut paste to the cooked dal, mix well. Add chopped tomato and 1- 1.5 cups hot water.Let it cook for 5-7 mins on low flame. Switch off the gas.
Heat oil in a pan and crackle the mustard. Add small onion and curry leaves. When the small onion starts changing colour, add green chillies. Fry it till the small onion turns golden brown. Add this to the dal and mix well.
Serve hot with plain rice, Pulao, Ghee rice or roti.
Notes
I pressure cooked the dal for 6 whistles on high flame. Keep the cooker closed till the pressure drops. Open the cooker and mash the dal. Make sure you dont mash it too much, so that it will become pasty. You can use Masoor dal or Green peas dal instead of toor dal.
I told you a few weeks ago about upcoming Onam recipes here, remember? This dish is quite close to my heart, since it has my fav veggies Chena (yam) and kaya (Raw plantain). If you don’t count the prep work of veggies, this recipe is easy to make. I used frozen yam for this. I was using it for the first time and I’m pretty happy with it. Since it was already cleaned and diced, half my work was done!
Well, what to say about this dish.. it’s a typical Kerala veggie dish loaded with coconut :) If you havent tasted it yet, I recommend you to try this. I like the texture of this dish. It’s a mix of three different elements… you’ve mashed veggies in there, then the chana gives a small crunchy texture and the slight grainy texture from the coarse coconut paste. Somehow all this works very well to give a balanced dish!
Kootu Curry always give me a sadya feeling. If you are like me, who makes only a mini sadya and not the full fledged version, you can include this in your mini version for the “sadya effect” :)
Pressure cook the soaked black chana with 1.5 cups water till it’s done. Drain the excess water…
Grind together coconut, 3 small onion, 2 green chillies, 1/2 tsp ginger, cumin,1/4 tsp turmeric powder, 1 tsp chilli powder and 2 tbsp water to a coarse paste…
Cook together the diced yam and raw plantain with 1.5 cups water, 1/4 tsp turmeric powder and salt. Bring it to a boil and simmer till it’s cooked and three-fourth of the water is dried. Add cooked chana to this and mix well…
Make a well in the centre of the veggie and chana mix. Add the coconut mixture to this. Cover the coconut mixture with the chana veggie mix. Cover and cook on low flame for 5-7 mins…
Heat oil in a pan and fry the coconut till it turns golden brown…
In the same pan, add little more oil and crackle the mustard seeds. Add sliced small onion, dried red chilli and curry leaves. Fry till the onion turns golden brown…
Mash the veggies well. Add the fried coconut and tempering to the veggie mix…
Black chickpeas (kadala) – 1 cup, soaked overnight
Yam (chena) – 1 cup, diced
Raw Plantain (pacha kaya) – 1 cup, diced
Turmeric powder – ¼ tsp
Water – 1.5 cups
Grated coconut – ¾ cup
Small onion/shallots – 3, chopped
Chopped ginger – ½ tsp
Green chilli – 2, chopped
Cumin – a pinch (optional, I didnt add)
Turmeric powder – ¼ tsp
Chilli powder – 1 tsp
To temper
Small onion/shallots – 3, sliced
Dried red chilli – 2
Mustard seeds – ¼ tsp
Grated coconut – 2 tbsp
Curry leaves
Salt
Coconut oil
Instructions
Pressure cook the soaked black chana with 1.5 cups water till it’s done, drain the excess water (refer notes).
Grind together coconut, 3 small onion, 2 green chillies, ½ tsp ginger, ¼ tsp turmeric powder, cumin (if using),1 tsp chilli powder and 2 tbsp water to a coarse paste.
Cook together the diced yam and raw plantain with 1.5 cups water, ¼ tsp turmeric powder and salt. Bring it to a boil and simmer till it’s cooked and three-fourth of the water is dried. Add cooked chana to this and mix well.
Make a well in the centre of the veggie and chana mix. Add the coconut mixture to this. Cover the coconut mixture with the chana veggie mix. Cover and cook on low flame for 5-7 mins. Mix everything together. Taste and see whether more salt is required.
Heat oil in a pan and fry the coconut till it turns golden brown. Add this to the veggie chana mixture. In the same pan, add little more oil and crackle the mustard seeds. Add sliced small onion, dried red chilli and curry leaves. Fry till the onion turns golden brown. Pour this over the veggie mix.
Notes
I pressure cooked the kadala for 7 whistles on high flame. Switch off the gas and keep the cooker closed till the pressure drops, around 15-20 mins. Open the cooker and drain excess water.
You can also use Vanpayar (red lobhia/cowpeas) instead of kadala for this recipe. Follow the same qty and method.
You can adjust the qty of coconut to suit your requirements. You can cook the kadala in advance and refrigerate for 3-4 days.
For the past couple of days, most of my conversation starts or ends with “Onamthinentha paripadi”? (what plans for Onam) So let me ask you, Onamthinentha paripadi? All set for the celebration?
Well, I dont have any major plans for Onam, apart from making some Paysam. So if you want to invite me for Onasadya, you know where to find me, right ;)?
Here’s another Sadya recipe. Again, this is a yogurt based dish. It can be made with different veggies and fruits like Okra, Beetroot, Raw Mango, Pineapple etc; I’m posting a Vellarikka (Golden Cucumber). It’s a very mildly spiced dish and it has a very refreshing feeling. I love to have this dish especially during summer, since it has a cooling effect.
Wish you a Happy Onam! Hope you have a beautiful time with your loved ones, Enjoy madi :)
Step by step pictures:
Grind together coconut, chopped garlic and jeera with 2-3 tbsp water to a smooth paste…
Heat oil in a pan and add cubed cucumber, sliced small onion,green chilli, ginger and salt. Stir it for 2 mins. Add 1/2 – 3/4 cup water. Cook till the cucumber becomes soft…
Add crushed mustard to this. Mix well. Add coconut paste, cook for 3-4 mins till the raw taste of coconut changes…
Remove from fire and add whisked yogurt. Combine well. Bring back to fire and keep stirring for 3-5 mins. Do not let it boil. Drizzle some coconut oil and remove from fire…
Grind together coconut, chopped garlic and jeera with 2-3 tbsp water to a smooth paste. Whisk the yogurt and keep aside.
Heat oil in a pan and add cubed cucumber, sliced small onion,green chilli, ginger, curry leaves and salt. Stir it for 2 mins. Add ½ – ¾ cup water. Cook till the cucumber becomes soft. Add crushed mustard to this. Mix well.
Add coconut paste, cook for 3-4 mins till the raw taste of coconut changes. Remove from fire and add whisked yogurt. Combine well.
Bring back to fire and keep stirring for 3-5 mins. Do not let it boil. Drizzle some coconut oil and remove from fire.
The dish has a medium thick consistency.
Notes
To clean the golden cucumber, peel the skin and remove the seeds. Then cut into bite sized pieces or cubes. You can store this in fridge for 2-3 days. If storing in fridge, it’s better to bring it to room temp and using it, rather than reheating it.